
When most people think of motorsports, they envision high-speed cars, skilled drivers and roaring engines.
What often goes unnoticed is the critical role that data analytics plays behind the scenes. In modern racing, success isn't just about raw power and driving skill — it's increasingly about harnessing vast amounts of real-time data to optimize every unit of time, temperature and movement to gain efficiency. With vehicles now equipped with hundreds of sensors, teams today face the challenge of not just collecting data, but processing it quickly enough to gain insights that can be turned into action in a few milliseconds.
The Gaucho Racing Formula SAE team from UC Santa Barbara tackled this challenge head-on, partnering with SingleStore to create a cutting-edge data acquisition system —the first of its kind ever deployed in the Formula SAE competition. Their 2024 competition car featured five nodes collecting data from over 200 sensors, transmitting four kilobytes of information every second.
This data, encoded as byte arrays, was sent via RabbitMQ to a cloud-based ingest service where it was decoded, scaled and uploaded to SingleStore. The team then streamed various insights to a React dashboard in real time. Despite the challenging network conditions often encountered at tracks — with limited bandwidth and potential interference — the system achieved an impressive average latency of just 270 milliseconds from data transmission to insight delivery. This performance underscores SingleStore's capability to ingest and process data, even under suboptimal conditions.
This guide walks you through the process of building a similar high-performance data acquisition and analysis system. We'll explain how to use SingleStore's technology to efficiently process sensor data and generate useful insights. This will demonstrate the practical application of data analytics in motorsports, and how it significantly impacts performance.
Overview
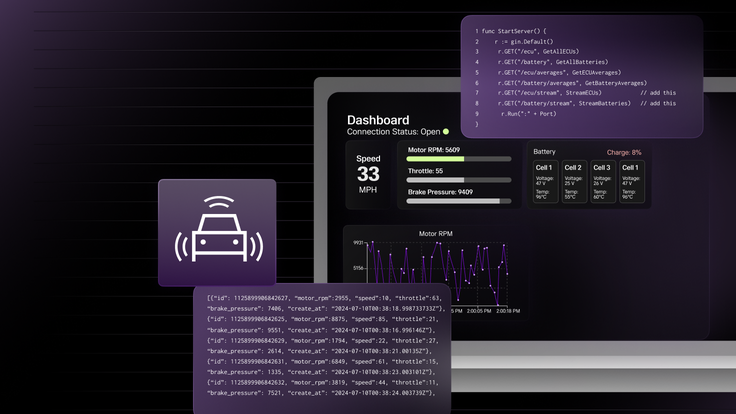
Here’s an overview of the system we are going to build. You can find the full project code here.
.png?width=1024&disable=upscale&auto=webp)
For the purposes of this guide, we are going to focus on what happens to the data once it leaves the vehicle. But for those curious about what’s actually happening on the car, here’s a brief explanation.
As mentioned earlier, modern vehicles consist of a series of nodes (which are just microcontrollers, each in charge of a specific domain) that communicate through a Controller Area Network (CAN) bus. This protocol was initially developed to reduce the wiring complexity and cost associated with communication between nodes in automobiles, but has since been adopted into everything from robotics to agricultural equipment.
A typical CAN frame will look something like this.
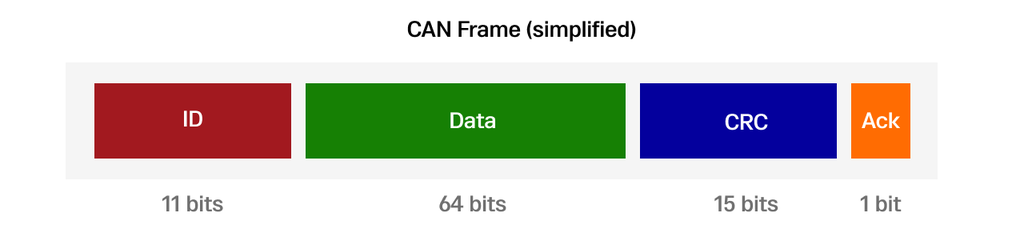
CAN is a broadcast-based protocol, meaning all messages are sent to every node. Nodes will often use the frame ID to filter out messages they don't care about. Here’s an example of what a couple CAN frames might look like on a car.

In the preceding table, there are two nodes: ECU and Battery. Each of them are constantly sending data in the specified format through the CAN bus. Let’s say the ECU wants to limit maximum throttle when the battery drops below 10%. It will listen for new messages with the 200 ID, reading the first byte of data to determine the charge level. This is very similar to how event-based systems, like Kafka, work.
Now that you know how the nodes on the car share data with each other, let’s look at how to get all that data off the car.
Message Queuing Telemetry Transport (MQTT)
MQTT is a lightweight communication protocol optimized for environments with limited resources or unreliable networks. Originally popular for remote IoT devices, MQTT's efficiency and reliability make it equally suitable for automotive applications. Its low bandwidth requirements and resilience to unstable connections allow vehicles to maintain robust, real-time data transmission — even in the challenging conditions of a race track.
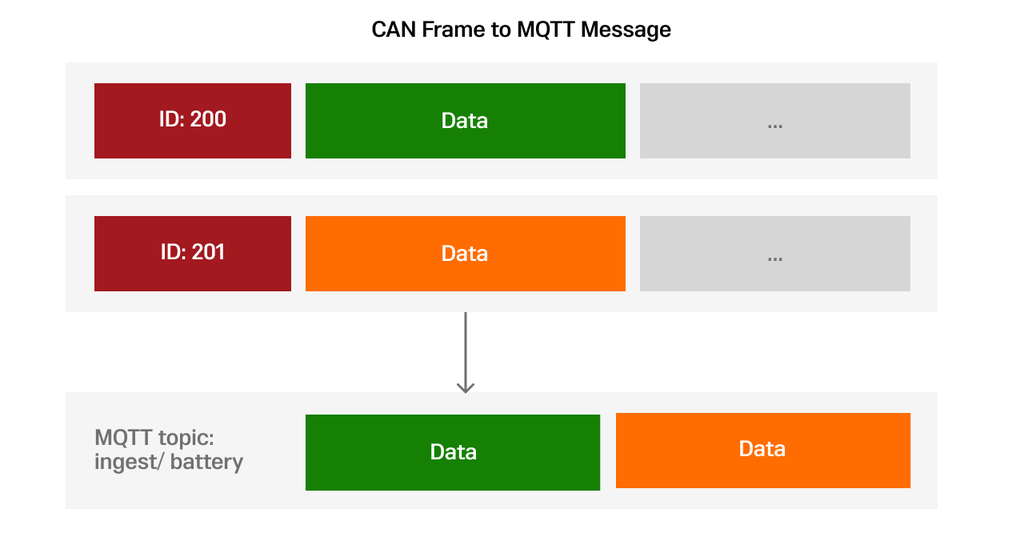
To send all the CAN data from the car to the MQTT broker, the Gaucho Racing team added an extra node on the car with an LTE module. This node listened for all CAN IDs and aggregated all the data bytes for each node into one byte array. This byte array was then published to a node specific topic. Since the format of the byte array is already well defined, the byte array can easily be processed to get the individual values sent by each node.
Here’s an example of what that conversion would look like for the Battery node we previously defined. The data bytes are extracted from the two battery frames (200, 201) and combined to create a MQTT message that is sent to the battery topic.
For our application, we will assume that our vehicle has the same nodes as defined above (ECU and Battery) and is publishing to the following MQTT topics:
- ingest/ecu: 8 bytes
- ingest/battery: 16 bytes
Let’s start by setting up a local MQTT broker. Nanomq is an ultra-lightweight broker that’s perfect for local development and testing. If you have Docker, you can run the following command to get a local instance of Nanomq up.
1$ docker run -d --name nanomq -p 1883:1883 -p 8083:8083 -p 28883:8883 emqx/nanomq:latest
While we will be using Nanomq for this guide, feel free to use any broker you want! As long as it supports MQTT 3.1, the code should work exactly the same. Just make sure to modify the configuration variables in the next step.
Ingest service
Our ingest service is responsible for subscribing to our vehicle’s MQTT topics, deserializing and scaling the raw data, and uploading it to our SingleStore database. We will be implementing this in Golang.
Start by initializing a new Go project, and installing the Paho MQTT client library.
1$ go mod init ingest2$ go get github.com/eclipse/paho.mqtt.golang3
Create a main.go file and add the following code. You should be able to run this and see “Connected to MQTT broker!” printed out. If you get an error, make sure your MQTT broker is running and the MQTT connection variables are set correctly.
Now that we are connected to the broker, let’s subscribe to our vehicle topics. Add the following functions. We also need to update the main function to call these methods. Note we also added an empty for loop at the end to keep the program running.
By now our program connects to the MQTT broker, listens for messages with the ingest/ecu and ingest/battery topics and prints out that it received a message. We’ll come back to these functions, but first we need to create some structs to hold our vehicle data. Create a new file called model.go and add the following structs. Below the struct definitions, add the following helper functions.
These functions take in a byte array as input, and output a struct with values populated according to our node data format. At the end of the ECUFromBytes function you can see an example of how scaling the raw values would look. The throttle value is typically an analog voltage reading from a pedal position encoder on the vehicle. For our throttle scaling, we are assuming the raw value will be in millivolts where 2000 mV (2 V) is our minimum reading and 4500 mV (4.5 V) is our maximum. Using these bounds the voltage reading is converted to a percentage value (0-100) to indicate the level of throttle pedal travel. We are also assuming that all the multi-byte values follow Big-Endian ordering.
Now, let’s go back to those subscription functions we wrote in main.go and update them to parse the message content. Our updated subscription functions now decode the bytes in the MQTT messages into Go structs using the functions we created in the last step. Let’s test out what we have so far. Start by running the ingest service. Note that since we have multiple files in the main package, we need to include all of them in our run command.
1$ go run main.go model.go # or just go run .2
We have our ingest service running, but we need to send some data to the MQTT broker to be able to actually test our system. Here’s a simple test script you can copy and run. It just generates random values for each of the fields in our ECU and Battery structs, converts them to byte arrays and sends them to the MQTT broker.
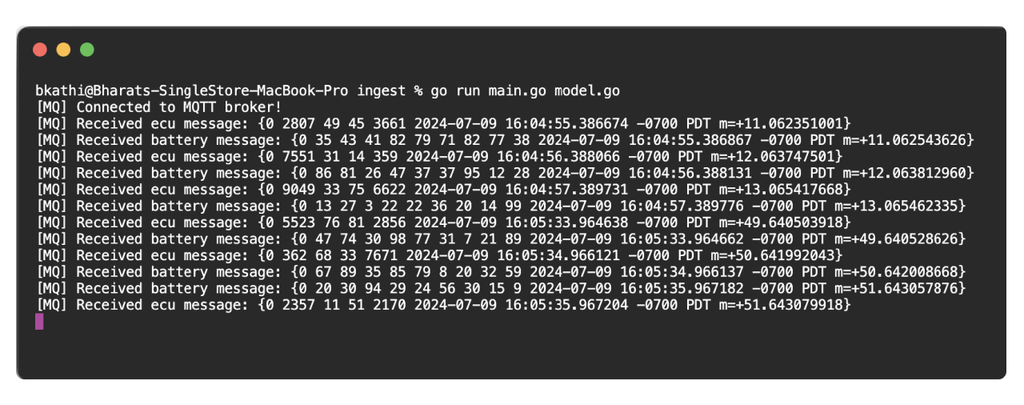
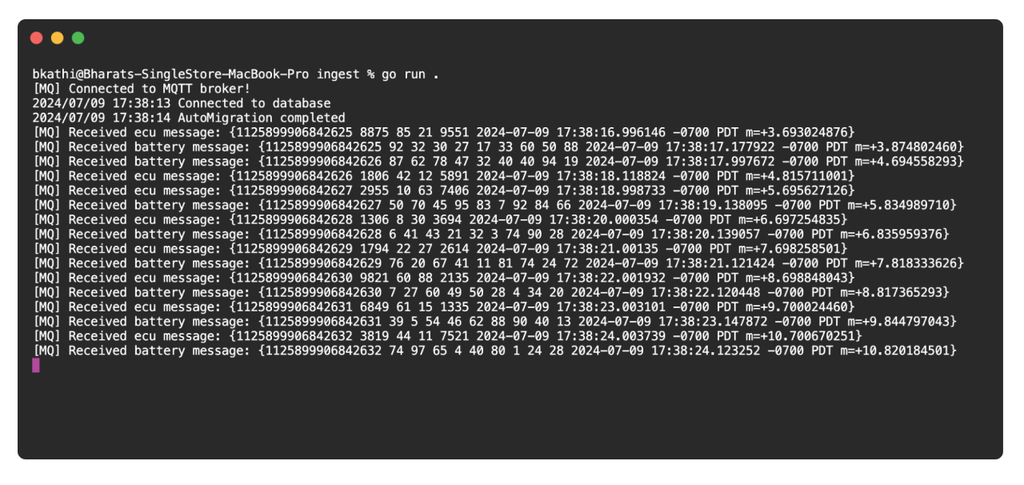
Once you run the test script, you should start seeing the decoded ECU and Battery structs being printed out. Pretty cool!
Now that our data is properly decoded and scaled, we can actually upload the data to SingleStore. To help us out with this, we’ll use GORM. GORM is an Object Relational Mapping (ORM) package that makes converting go structs to SQL rows (and vice-versa) and making queries against our database super simple.
1$ go get gorm.io/gorm2$ gorm.io/driver/mysql
If you don’t already have a SingleStore database up and running, you can follow the instructions here. Create a db.go file and add the following code. Make sure to set the database connection variables to the correct values for your SingleStore database. Don’t forget to call ConnectDB() from main.go.
Before we test this out, we need to make a few changes to our struct definitions in model.go. GORM uses tags to help it properly map go structs to database tables. By tagging our ID fields as primary keys, GORM will automatically tell SingleStore to auto-increment them and use them as shard keys.
Run the ingest service to make sure that our structs are being migrated properly.
1$ go run .
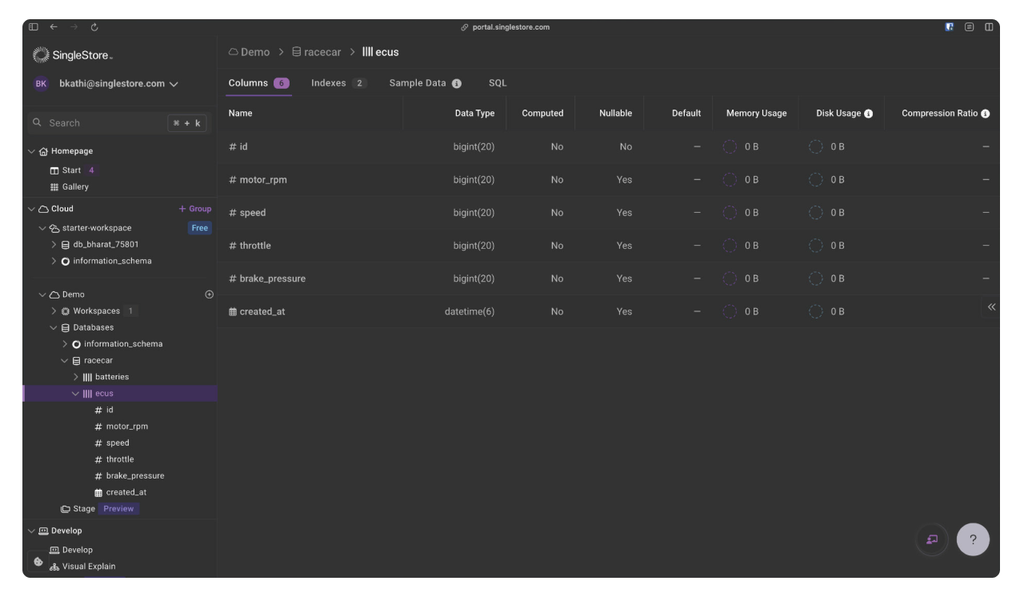
If everything worked, you should be able to see the ECU and Battery tables in SingleStore.
Now, let’s actually create new entries in our database. Add the following function to db.go. Then modify the subscription handlers in main.go.
Now run the ingest service and the test script. You should be able to see the ECU and Battery structs being printed out again, but this time the ID should be populated instead of defaulting to 0.
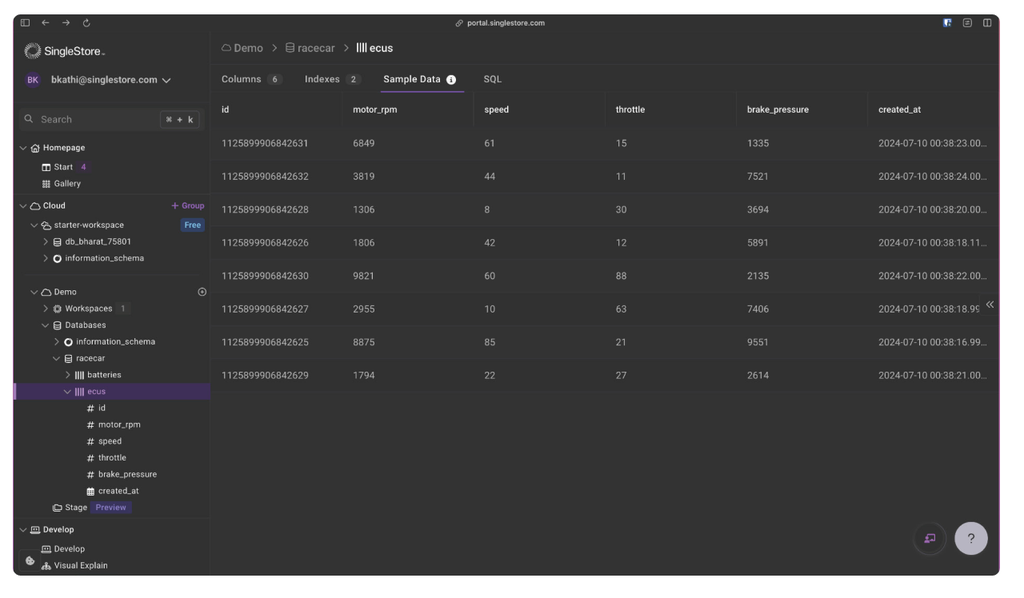
You should also be able to see the tables in SingleStore now populated with our data.
We now have a working pipeline to ingest our vehicle data in real time to SingleStore! Now the last piece of the ingest service puzzle, let’s create a way to get some of that data out of SingleStore. To do this we are going to create a basic REST API to return all the ECU and Battery rows from our database. We are also going to create a WebSocket endpoint to stream new entries directly to the frontend. Start by installing Gin, a web framework that will allow us to quickly build out our API.
1$ go get github.com/gin-gonic/gin2$ go get github.com/gorilla/websocket
Create a file called api.go and add the following code. This will start a web server on port 9000 and register two routes. The GetAllECUs and GetAllBatteries functions use the GORM Find function to get all row entries from the database for those tables. It’s just a SELECT * query under the hood.
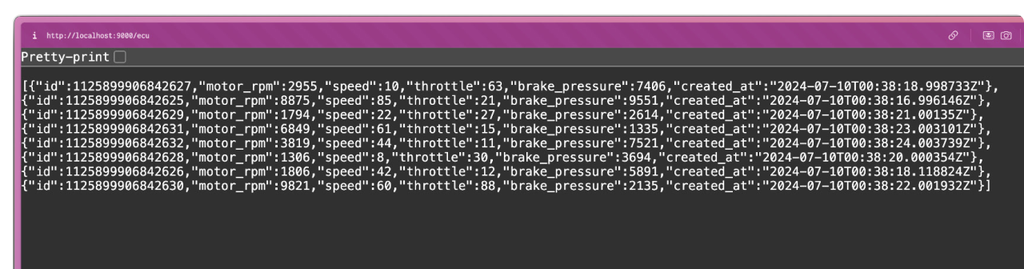
Call the StartServer function from main.go. Now try going to localhost:9000/ecu — you should see something like this.
Next we are going to implement some endpoints to get the averages for each of our tables. Add the following code to api.go. In each of the average functions, we first create a struct to define our response schema. Then we run a SELECT query to get the averages for each column and scan the values straight to our response struct.
Run it again and try going to localhost:9000/ecu/averages. You should now see all the ECU averages returned. The last endpoints we are going to add are our websocket connections. The goal is to have the frontend be automatically sent new ECU and Battery entries as soon as they are received and decoded from our MQTT broker. To accomplish this, we need to create a simple callback and subscription system.
In model.go, add the following functions. We first create two variables which are arrays of functions. These will store functions to be called once new ECU and Battery entries are created. The register callback functions simply add new functions to the callback arrays. Lastly the push functions take in an entry as input, and call all the respective callback functions.
Now modify the create functions in db.go to call our new push functions as soon as the entries are created in the database. Now we can call the register functions from api.go to essentially subscribe to new ECU and Battery entries that are created. To create our websocket endpoints, add the following to api.go. These endpoints call our register functions from before, and send the ECU and Battery entries straight to the client as soon as they come in.
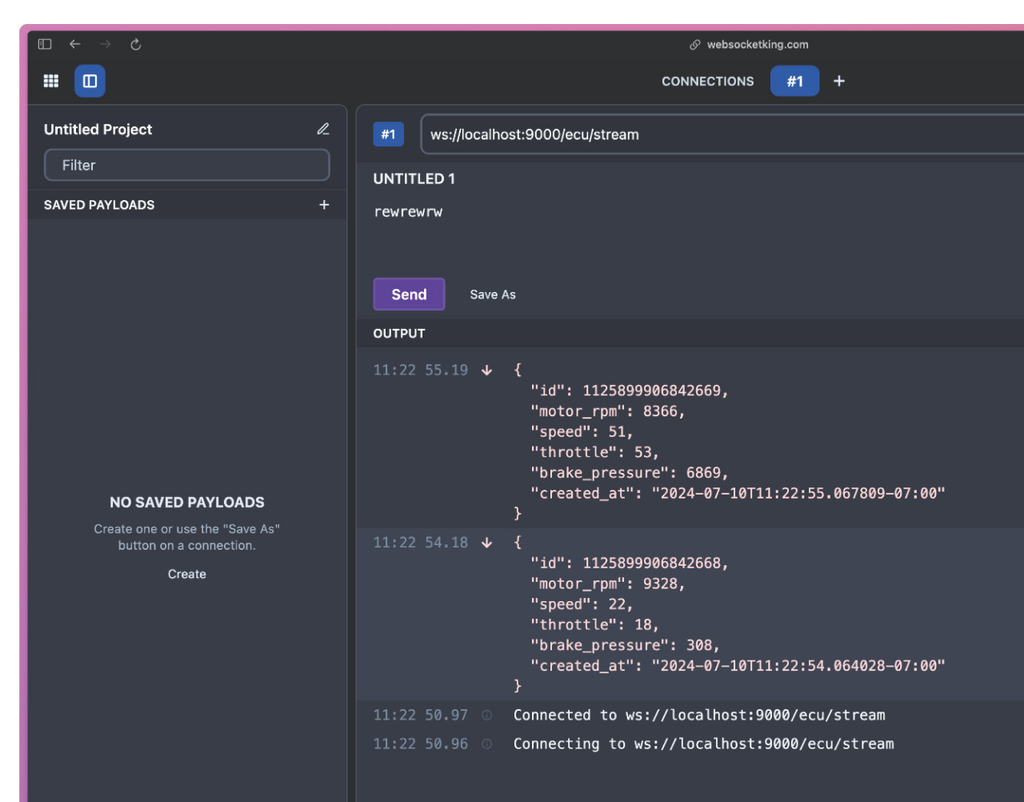
Now run the ingest service. To test our websocket endpoints we can use https://websocketking.com. Enter ws://localhost:9000/ecu/stream into the Websocket URL field. Now run the test script. You should start seeing the new ECU entries coming in!
Perfect, we have finished creating our ingest service! Next let’s look at how we would create a dashboard to visualize all this data.
Dashboard
We won’t go into the full details of creating the Dashboard, but just a few examples of how to retrieve and display data from the backend. For this guide, we are using React with Typescript.
Here’s an example of retrieving the ECU data from our backend. It makes a request to our backend /ecu endpoint to retrieve all ECU entries from our database. Then it uses the react-use-websocket package to create a websocket connection to our /ecu/stream endpoint and listen for new ECU entries.
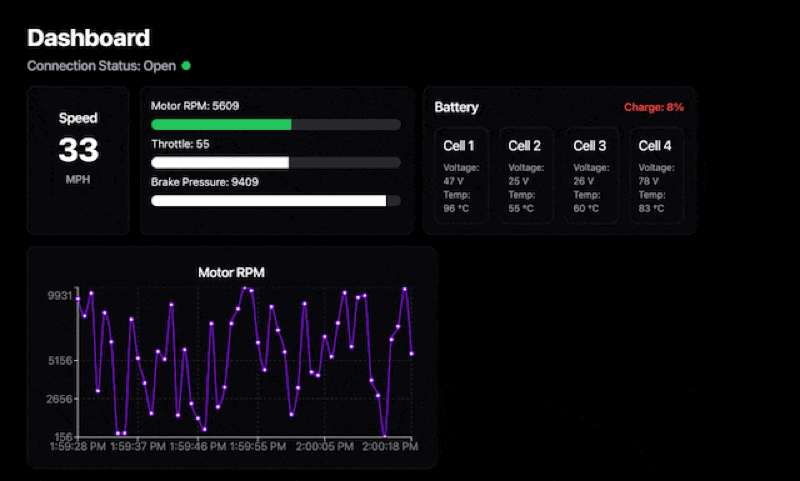
And here’s an example of creating a simple line chart for the ECU motor rpm using the recharts package. Here’s an example dashboard with the test script running. The full code for this dashboard is available here.
Summary
In this article we saw how to pull data from a range of sensors from a moving car, upload to SingleStore through a MQTT broker and finally create a real-time dashboard that shows actionable metrics. While we focused on vehicle telemetry, this pipeline can be readily adapted for any scenario involving remote edge devices, from industrial IoT to environmental monitoring.
By leveraging these technologies, organizations can transform raw sensor data into valuable insights with minimal latency, enabling rapid decision-making in fast-paced environments.


-for-Real-World-Machine-Learning_feature.png?height=187&disable=upscale&auto=webp)


